Just because you've plucked all your garden's fruits and veggies and watered your flowers for the last time doesn't mean your gardening job is over. It's time to start harvesting seeds. While it's hard to ignore the bigger and brighter hybrids flaunted in flashy catalogs, you'll enjoy substantial savings by growing plants from your own seeds. Don't let the naysayers steal your joy! With enough tender love and care, your seeds can sprout into beautiful plant babies.
When to Harvest Seeds
Summer and fall are the main seed-harvesting times since spring and summer flowers will set seed by then. You can harvest seeds in the spring for early flowering and short-lived plants. This timeframe may extend to winter for fruits that mature in late fall.
If you keep a watch on the plants you want to grow from seeds, you should see the seed heads and fruits maturing from the jump. Let your plants give you the sign that their seeds are ready for picking.
How to Harvest Dry Seeds
Seeds are a vital part of plant reproduction cycles. They make flowers for the very purpose of creating seeds — seeds that the next generations will grow. Keep in mind that it's the flower heads that eventually become seed heads in many plants.
When flowers wither in your garden, you may be deadheading them or diligently removing the dead heads to encourage more growth. If you want to harvest seeds, you should allow the withered flower heads to remain on the plant until the seeds inside them mature. Even the stalks of flowers that grew from bulbs can be left on the plant to make seeds. The green portion left behind when the petals die off continues to grow and support the seeds inside.
When these seed heads start changing color or begin to open, be ready with your seed-collecting paraphernalia to grab them before Mother Nature's best foragers do.
Step 1: Gather the Seed Heads
The way you gather seeds depends on the plant's structure.
Compact Flower Heads
For compact seed heads that don't burst open (indehiscent), snip them off with a sharp pair of scissors when they're nearly dry. This is the right way to collect marigolds, zinnias, dahlias, coneflowers, globe amaranth, and pinks seeds.
Legume and Flower Pods
Some seeds, like those of runner beans and peas, come packed in pods that grow in the place of flowers when the petals are gone. Don't allow them to dry on the plants, or they may burst open (dry dehiscent) and spread the seeds around. You can harvest the pods of poppy, sweet pea, morning glory, beans, and okra when they're nearly dry.

Large Seed Heads From Various Plants
Plants with large flower bunches have large seed heads, too. First, place a brown paper bag over the bunches of amaranths, celosia, cleome, cilantro, Queen Anne's lace, and ornamental grasses and tip the flowers before cutting them off the plant.
Leafy Vegetables and Herbs
If you're growing green leafy vegetables such as spinach, collard greens, or some herbs like mint, cilantro, or basil, you may not see any flower heads on them. That's because you're harvesting them regularly. But if you let one or two plants grow without snipping their leaves and stem tips, they'll eventually flower. These flower bunches will set seed after the flowers die. You can harvest the whole bunches when they start to yellow or dry up.

Spinach has male and female plants, and you get seeds only from the female ones. Collect the very tiny seeds in plastic bags by keeping the nearly dry flower heads inside and crushing them with a rolling pin.
Conifers
Collect mature cones that are slightly open and dry them in a warm but shady place until they fully open up and release the scaly seeds. Some conifers' fresh seeds sprout if they're planted immediately.
Note that once they are dried and stored, they will have to undergo a long stratification process before germinating.
Step 2: Dry the Seeds
Separate each type of seed and then place them between sheets of newspaper. Keep them in a shady spot for a few days to continue drying out.
Step 3: Separate the Seeds
Separating the seeds is called threshing. Some seeds may come out of their pods on their own or when you shake them inside a paper bag. It's good to know the different kinds of threshing so you're ready for all the scenarios.
- Grains are threshed by beating or stamping.
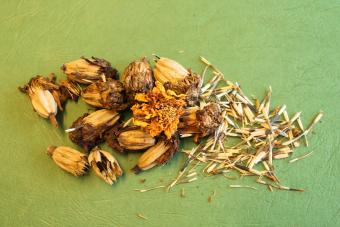
- For marigolds and zinnias, open up the seed head manually to get the seeds. You can find the seeds among the other flimsy material called chaff since the seeds will be mostly darker or plumper than the rest.
- For the small seeds of amaranth and celosia, you may need to rub them between your hands or crush them with a rolling pin to actually get to them.
Step 4: Clean the Seeds
There will be a lot of stuff in the seed heads other than seeds. Just think about how much stuff you track inside on your clothes and in your hair after a few hours in the great outdoors. If you're directly sowing the seeds after harvesting them, cleaning isn't necessary, but seeds that aren't cleaned may spoil faster during storage.
Some seeds are big enough to be hand-picked, but for others, you may need to winnow them or use a strainer with holes just the right size for the seeds.
How to Winnow
You can use a hand fan for winnowing small seeds and a hair dryer set at a 'cool' setting for heavier ones.
- Put the seeds in a bowl and pour them onto a newspaper in a continuous stream as you fan the stream gently.
- The chaff will fall farther away from the seeds as it doesn't weigh as much.
For small quantities, you can just blow into the seeds as you pour them out. The more you've got, the more likely it is you'll need to use a fan.
Step 5: Store Your Seeds
When everything's completely dry and free of debris, you can store your seeds in labeled glass bottles with tight caps. Make sure you include the plant's name and date of collection somewhere on the storage containers. But feel free to add as much information as you want, such as their color, genus, etc.

How to Harvest Wet Seeds
Some seeds are wet because they're inside fleshy fruits. Cherries, plums, avocados, mangoes, and almonds have a single seed inside, while others, like apples, pears, and oranges, have a few more. Some, like pomegranates, kiwifruit, passion fruit, and tomatoes, are so full of seeds that they get eaten. Even though tomatoes are often considered vegetables, they're actually fruits, as are peppers, eggplants, bitter melons, and cucumbers.
If you have any fruits or vegetables containing seeds inside that you want to harvest, let them stay on the plant/tree until they're ripe.
Step 1: Gather the Fruits
Only harvest seeds that come from fruits/vegetables ripened on the plant if you plan to plant them in the future. The seeds inside fruits that aren't fully ripe may be immature. Fallen fruit, even slightly rotting ones, are the best. Make sure you keep your seeds separate as you collect them.
Step 2: Separate the Seeds From the Pulp
You'll need to remove the pulp from the seeds.
- It's relatively easy to separate the seeds from an apple or a ripening pepper. Just cut them open carefully and tip the seeds into a bowl.
- For fleshy tomatoes, tomatillos, kiwi, and passion fruit, you'll have to scrape out the seed-containing pulp into a bowl of water, using a grapefruit spoon.
- Cucumbers, melons, squash, and papaya have a central area where the seeds are concentrated. Remove that into a bowl.

- Peaches, plums and cherries may give you fruits true to their parent plants. Allow the fleshy fruit to rot a bit further before you dig out the pits. You have to break them with a hammer to get the almond-like seed inside. Once you've extracted it, store it in the refrigerator.
- Juniper seeds should be stripped of all the berry tissue first. Once the seeds have been obtained, they'll need to be scarified (nicked or sanded) and then put through a three to four-month period of warm stratification and another three to four months of cold stratification to get them to sprout.
Step 3: Ferment Cucumber and Tomato Seeds
Not all seeds require this step. However, passing certain seeds like those from the tomato and cucumber families through a fermentation process makes them sprout faster and increases their germination rate. For the seeds that need to be fermented, don't wash them until after you've finished this process.
Cut the fruits open and squeeze the seed-containing juicy portion into a glass bottle. Add the same amount of water and stir well. Put tomato seeds aside in a warm place for two to four days. When following this process for the cucumber family of plants — squash, melons, gourds — give them approximately one to two days of fermentation.
Check for bubbles in the juice and a scum on top. When you see these signs of fermentation, add more water and shake well after closing the bottle. Pour out the liquid portion and repeat the process until the seeds are clean and the water is clear.
Step 4: Clean the Seeds
Many wet seeds have lots of flesh attached to them.
- Stand the seeds in a bowl of water for a while and then beat up the slush with a whisk to separate it from the seeds.
- Skim out most of the waste and pour out as much of the water as possible.
- Repeat the process until only seeds are remaining in the bowl.
- Wash them thoroughly until they're free of all the slime.

If you find any floating seeds, discard those. As a general rule, good seeds sink, and bad ones float. Of course, there are exceptions. For example, the lotus flower naturally depends on water currents to disperse them, so good lotus seeds will float. Drain the cleaned seeds in a fine sieve until you remove as much moisture as possible.
Step 5: Dry the Seeds
Spread the seeds out in a single layer on a pane of glass or on ceramic plates. Dry them in some shade and scrape them onto a piece of paper. Dry seeds shouldn't just feel dry to the touch but should make a dry rattling sound, too.
Step 6: Store the Seeds
Store the dry seeds in tightly closed and labeled glass bottles. Make sure to add the date of collection and other details that'll help you identify them later on.
Seed Storage and Viability
Water is a big no-no for stored seeds. Always house your seed collection in a cool and dry place. Most seeds stay viable until the next growing season, but their germination rates steadily decrease after the first year. However, some seeds, such as beans and grains, remain viable for two to three years or more when stored well.
Keep Your Plant's Lineage Going
When you garden, you make a real connection to the plants you grow. Much like dog breeders who have pages of puppies from one line, you can extend your plant's lineages by harvesting their seeds. There's nothing more beautiful than the symbiotic relationship between a gardener who loves and cares for their plants and the plants that sustain them.